Learning System Design #8: WebRTC — How Real-Time Communication Actually Works
Eighth part of the “Learning System Design” series! This time — WebRTC. The technology that powers every video call you’ve ever made in a browser, every screen share in Google Meet, and every peer-to-peer file transfer that “just works” without installing anything.
Before WebRTC, real-time communication on the web required Flash, Java applets, or proprietary plugins. WebRTC made it a native browser capability — no plugins, no downloads, no intermediary servers for the actual media transfer. And the best part? It’s not just for video calls.
What is WebRTC?
WebRTC (Web Real-Time Communication) is an open-source project and set of browser APIs that enable real-time, peer-to-peer communication directly between browsers and devices.
Traditional approach:    Client A → Server → Client B  (server relays everything)

WebRTC approach:         Client A ←――――――→ Client B   (direct peer-to-peer)
                              ↑
                         Server only helps with setup (signaling)
WebRTC gives you three core APIs:
- getUserMedia — capture audio and video from cameras and microphones
- RTCPeerConnection — establish and manage peer-to-peer connections
- RTCDataChannel — send arbitrary data peer-to-peer (files, game state, text, binary)
That third one is the most underappreciated. WebRTC is not just for video calls — you can send any data directly between browsers with sub-100ms latency. Game state, file transfers, real-time collaboration — all without your server touching a single byte of the actual payload.
The Connection Lifecycle
Establishing a WebRTC connection is the most confusing part for newcomers. There are many moving pieces, so let me walk through it step by step.
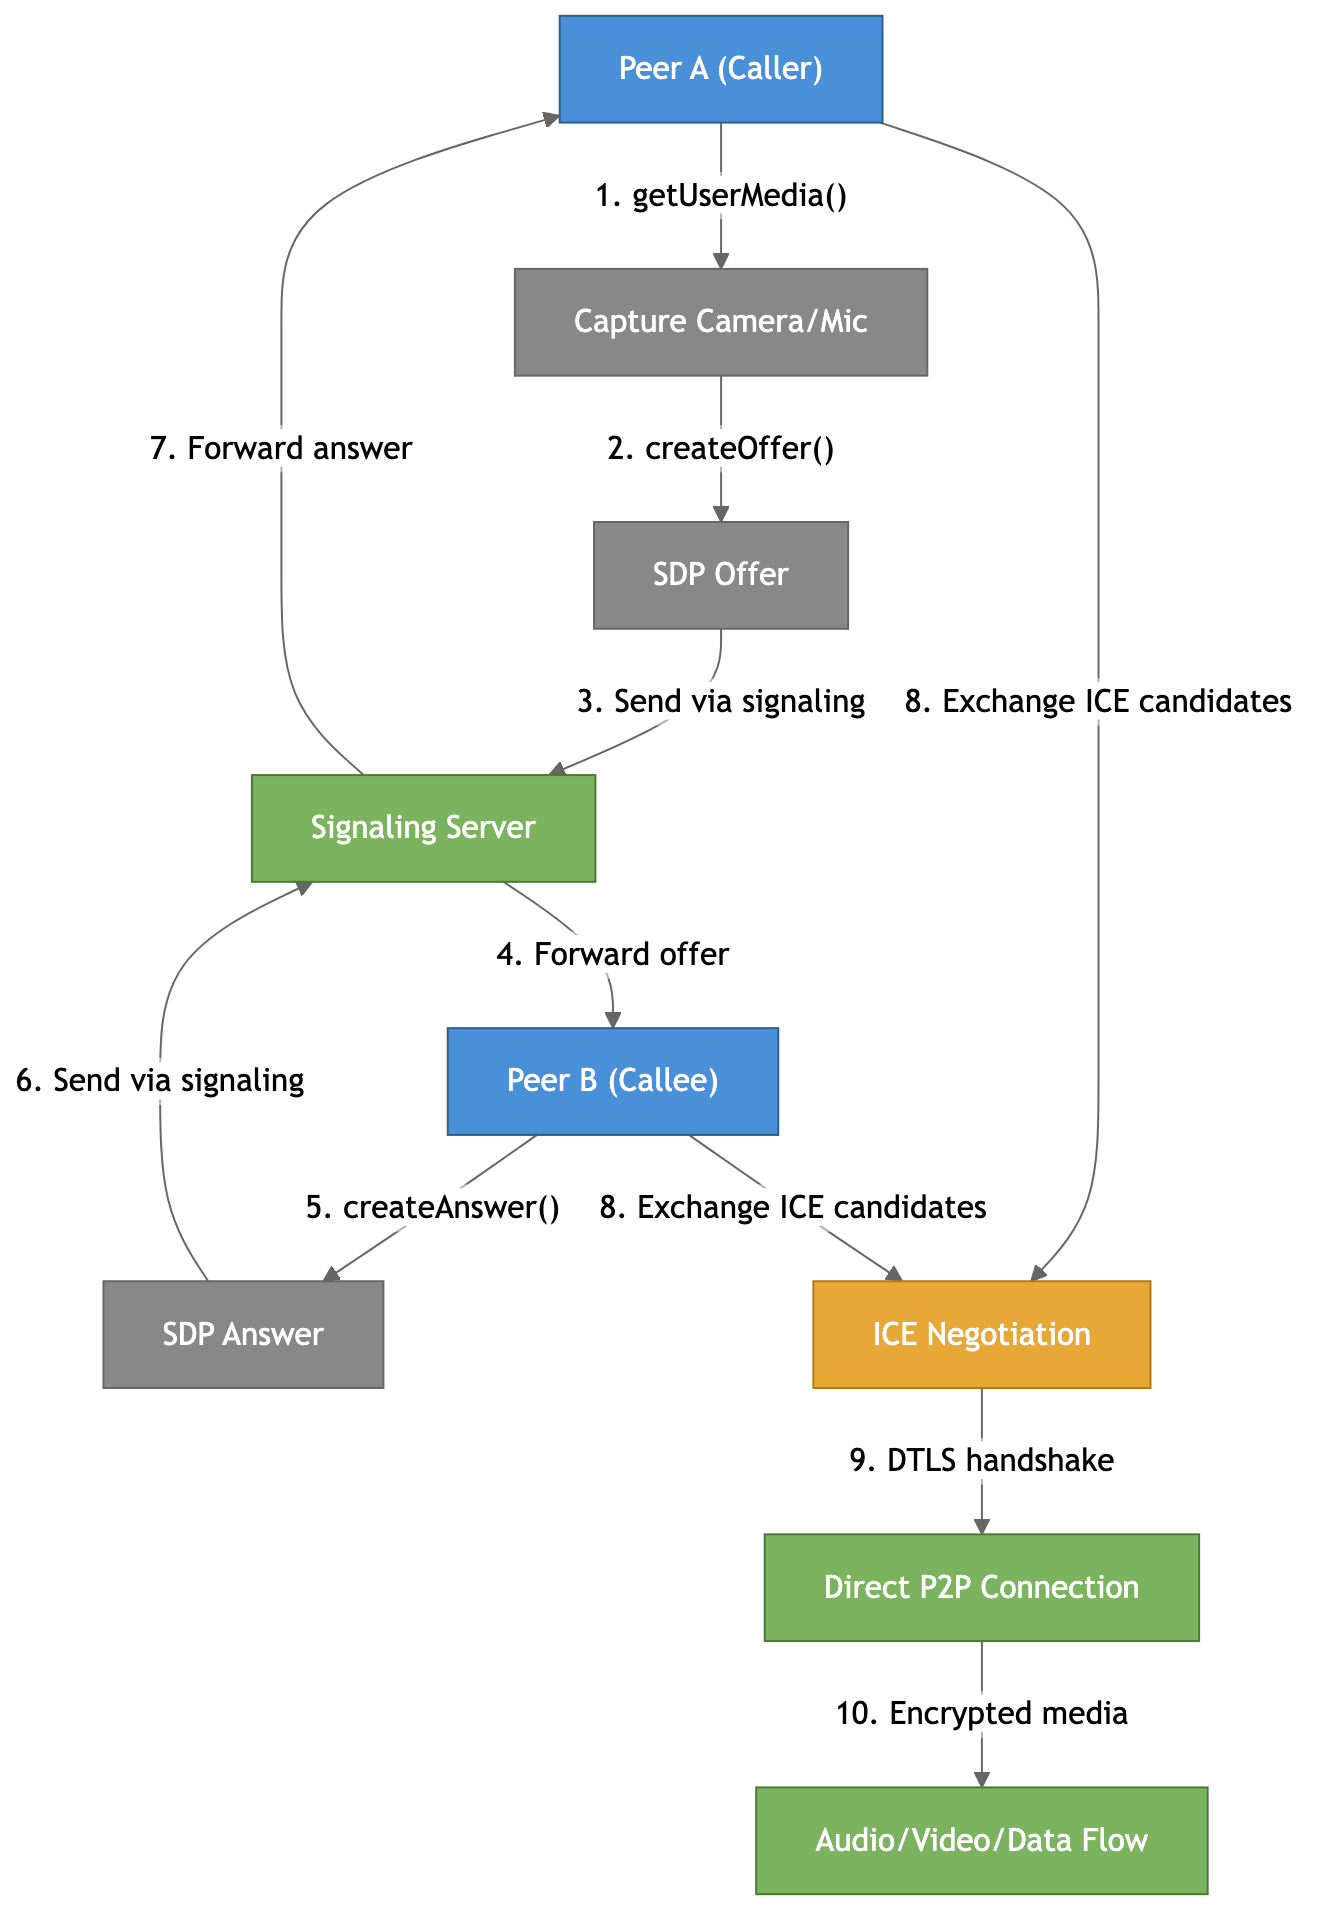
1. Capture media — getUserMedia() accesses the camera and microphone.
2. Create an offer — the caller creates an SDP (Session Description Protocol) offer describing what codecs, resolutions, and capabilities it supports.
3-4. Exchange via signaling — the offer goes through a signaling server (your server — more on this below) to the other peer.
5-7. Answer back — the callee creates an SDP answer and sends it back through the signaling server.
8. ICE candidates — both peers discover their network addresses and exchange them.
9-10. Connect — ICE finds the best path, DTLS establishes encryption, and media flows directly between peers.
The key insight: the signaling server only handles the initial handshake — it never sees the actual media. Once the connection is established, everything flows peer-to-peer.
Signaling — The Only Server You Need
Here’s the chicken-and-egg problem: to establish a direct connection, two peers need to exchange information about each other. But they can’t do that directly because… the connection doesn’t exist yet.
Think of it like a phone call — before you can talk to someone, you need their number. But WebRTC peers don’t have “phone numbers.” They have temporary, dynamically discovered network addresses hidden behind NATs and firewalls. Someone needs to introduce them.
That someone is the signaling server. It’s just a middleman that passes messages between peers during setup. Usually a WebSocket server, though you could use HTTP polling, Firebase, or literally anything that can deliver messages. You could pass SDP on a Post-it note and type it into the other browser — it would work.
Three things get exchanged during signaling:
- SDP — “what media do you support?” (codecs, formats, DTLS fingerprint)
- ICE candidates — “how can I reach you on the network?” (local IP, public IP, relay address)
- Session control — join/leave room, mute, hang up
After signaling is done, your server goes idle. It never sees the media. This is why WebRTC scales well — the signaling server only handles small JSON messages, not video streams.
NAT Traversal — The Hard Part
This is where most WebRTC complexity lives. WebRTC promises peer-to-peer, but the internet wasn’t designed for that. Most devices sit behind NAT (Network Address Translation) — your laptop, phone, and smart TV all share one public IP address assigned to your router. From the outside, nobody can reach your device directly.
Two problems:
- Peers don’t know their own public address. Your laptop knows it’s 192.168.1.5 on the local network, but has no idea the outside world sees it as 85.1.2.3:12345.
- NATs block unsolicited incoming traffic. Even if you knew the other peer’s public address, their router would drop your packets — it only allows responses to outgoing requests it already knows about.
WebRTC solves this with three mechanisms: STUN, TURN, and ICE.
STUN — “What’s My Public Address?”
STUN is a simple server on the public internet that answers one question: “What’s my public IP and port?” You send a packet to the STUN server, it sees where the packet came from (your router’s public address), and tells you. Now you know what to tell the other peer.
Google provides free STUN servers (stun:stun.l.google.com:19302). STUN is lightweight, fast, and only contacted during setup.
Once both peers know their public addresses, they try UDP hole punching — both send packets to each other simultaneously, creating entries in their NAT routers that allow the traffic through. When it works, you get a direct P2P connection with zero server cost.
This works for about 50-65% of all internet connections.
TURN — The Fallback Relay
Sometimes direct P2P is impossible. Symmetric NATs (common on mobile carriers and corporate networks) create a different external port for every destination, making STUN-learned addresses useless. Corporate firewalls might block all UDP entirely.
TURN is a relay server — all media flows through it. It always works because:
- TURN can run over TCP port 443, looking like HTTPS to firewalls
- Even the strictest corporate firewall allows outbound TCP/443
- Both peers can reach the TURN server with normal outbound connections
The downsides: added latency (+10-50ms), bandwidth cost (the server relays every byte in both directions), and it costs real money to operate.
About 10-20% of connections need TURN, but it varies dramatically — home broadband needs it ~5-10% of the time, while corporate networks need it 25-40%.
ICE — The Orchestrator
ICE (Interactive Connectivity Establishment) ties everything together. It gathers all possible network paths, then systematically tests them to find the best working connection:
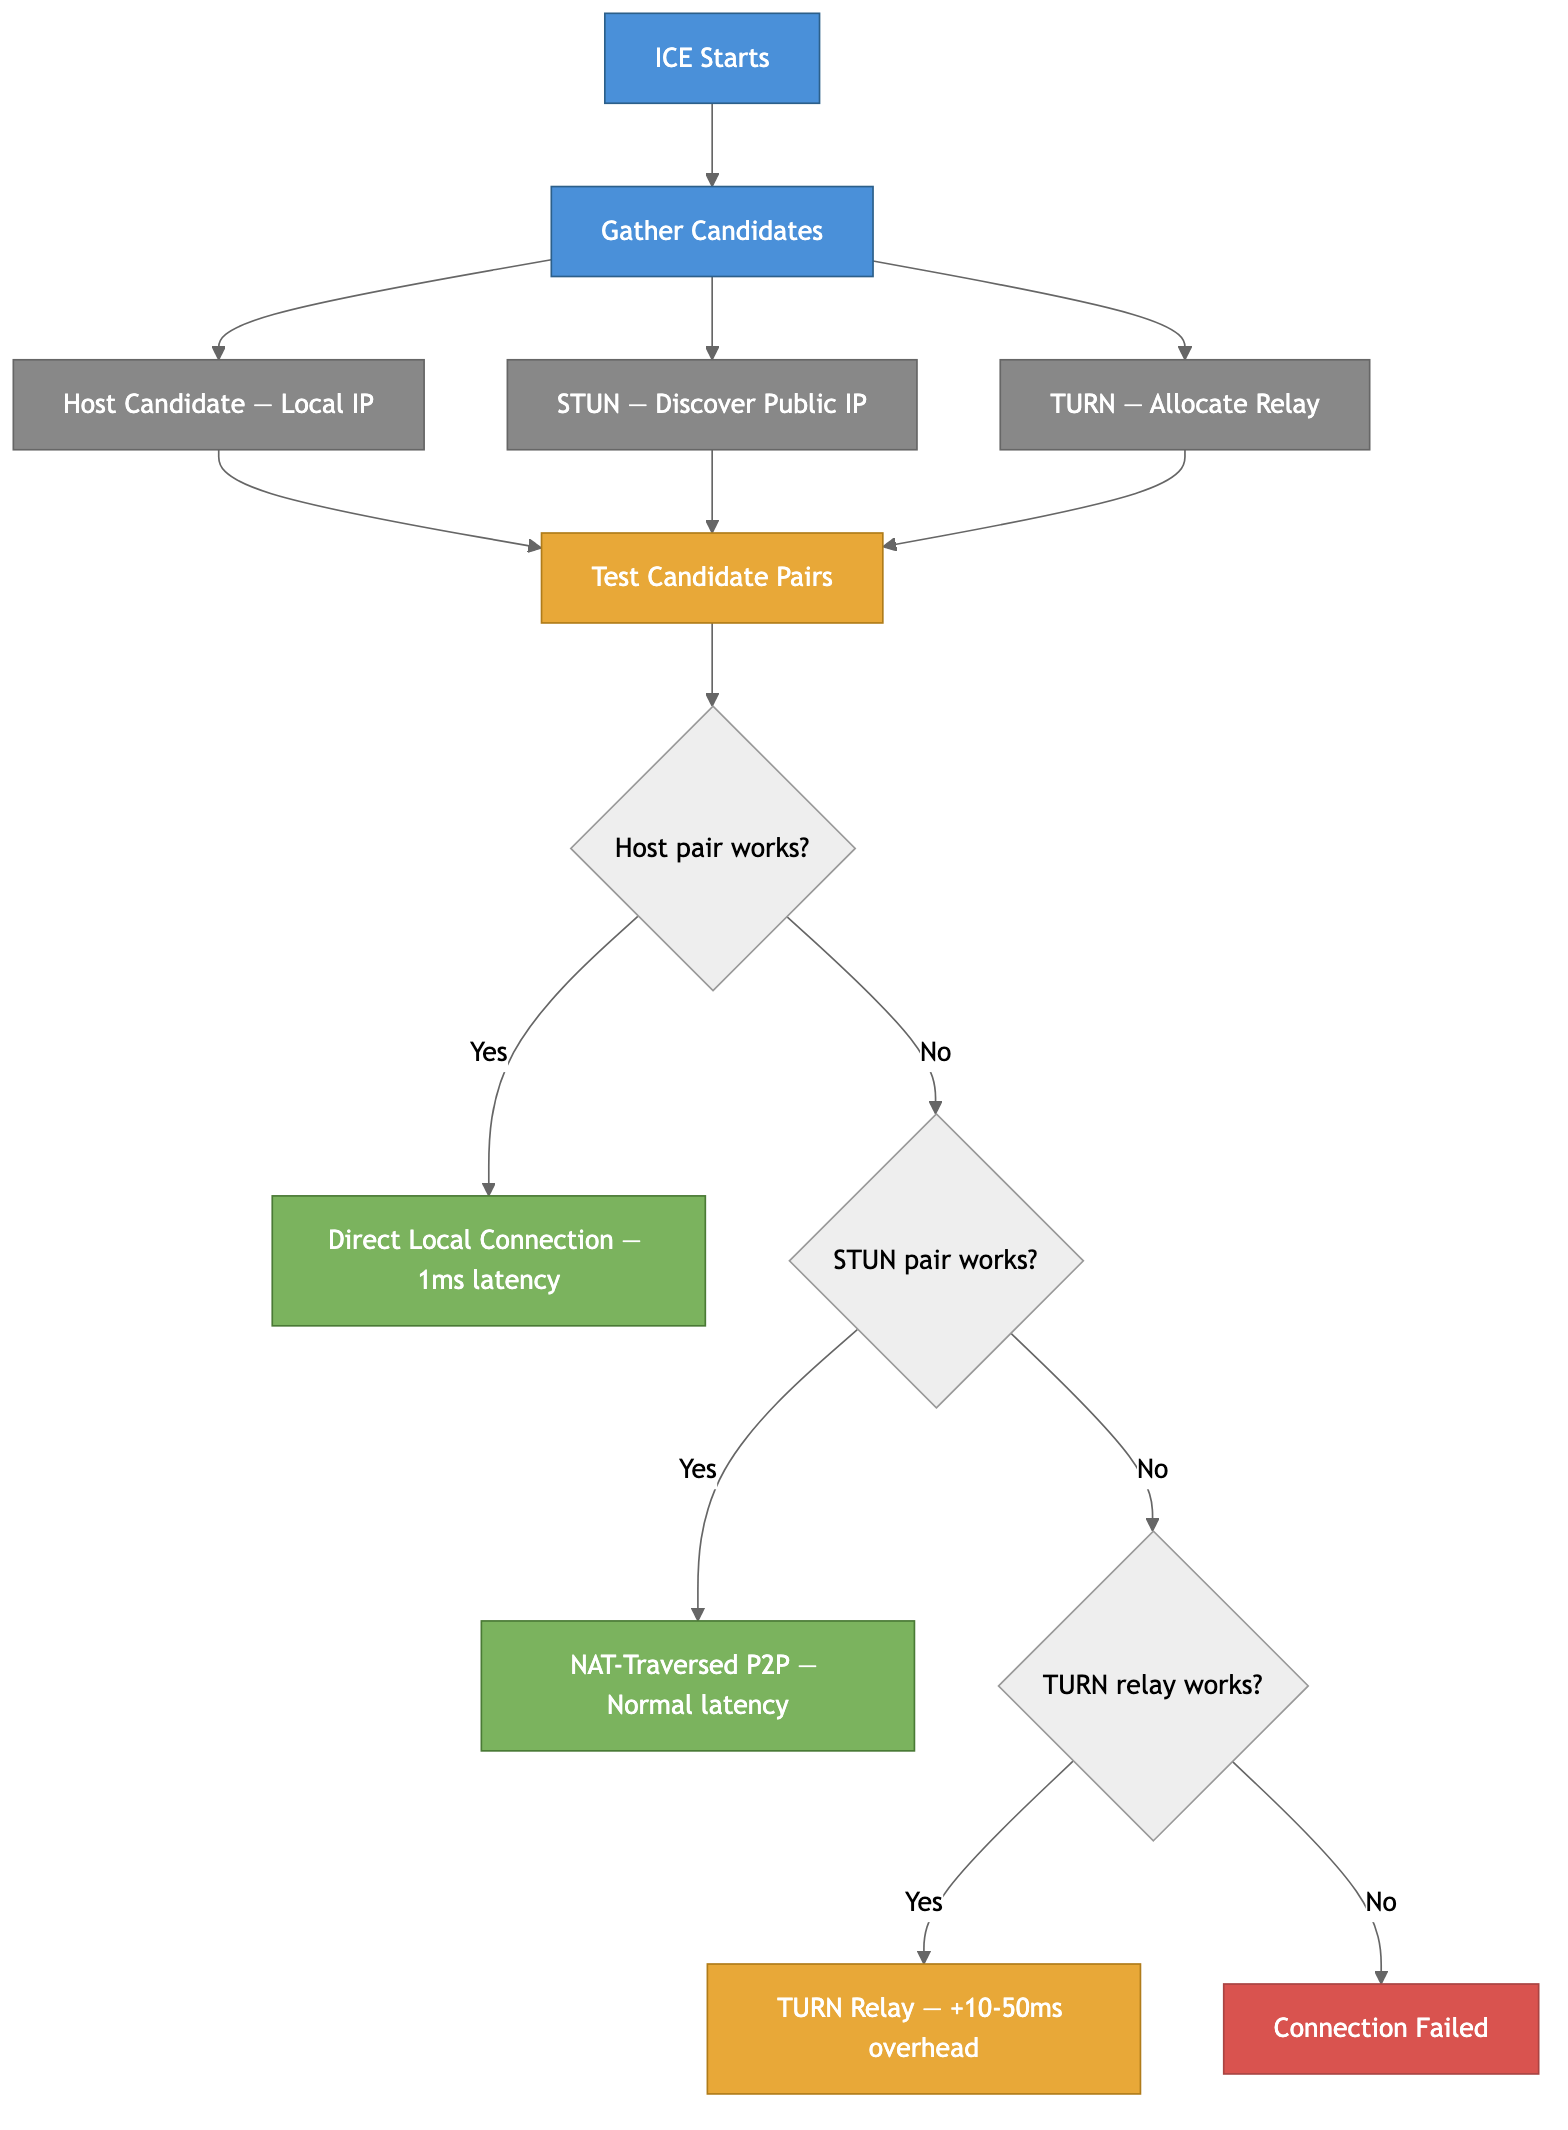
ICE tries host candidates first (direct local IP — fastest), then STUN candidates (NAT-traversed P2P), then TURN relay (slowest but always works). With Trickle ICE, candidates are tested as they arrive rather than waiting for all to be gathered — this can reduce connection setup time from 3-5 seconds to under 1 second.
The takeaway: always deploy TURN servers. Even if 85% of your users connect directly, the remaining 15% will have a completely broken experience without TURN. In enterprise or mobile-heavy products, it can be 30-40% of users. TURN is not optional for production — it’s insurance.
The Protocol Stack
WebRTC doesn’t run over HTTP. It builds its own protocol stack, primarily over UDP:
- UDP — the base transport. Real-time media can’t afford TCP’s head-of-line blocking
- DTLS — TLS but for UDP. Handshake, peer authentication, key derivation
- SRTP — encrypts and authenticates audio/video. Mandatory — no unencrypted mode exists
- SCTP — carries data channel messages. Supports reliable and unreliable delivery modes
Everything multiplexes onto a single UDP port. The transport layer examines the first byte of each packet to route it to the right handler. This single-port design is critical — one port through the NAT, one firewall rule.
Why UDP and Not TCP?
TCP with packet loss:    Packet 2 lost → Packets 3,4,5 HELD IN BUFFER
                         → Wait for retransmit → Release all at once
                         → Result: massive jitter spike

UDP with packet loss:    Packet 2 lost → Skip it, play packet 3
                         → Result: brief glitch, smooth otherwise
A lost video frame from 200ms ago is useless. Better to skip it and show the next one.
Server Architectures — Mesh, SFU, MCU
For 1:1 calls, direct P2P works great. But what about group calls with 10, 50, or 500 participants? Three architectures:
Mesh — every peer connects to every other peer directly. Simple, but N peers need N*(N-1)/2 connections. At 4 peers you’re encoding and uploading 3 separate video streams. At 10 peers it’s completely unusable. Only works for 2-3 participants.
SFU (Selective Forwarding Unit) — each peer sends one upload to the server, the server forwards it to all other peers without decoding or re-encoding. This is what Zoom, Google Meet, and every serious video platform uses. The sender can use simulcast — encoding at multiple quality levels (720p + 360p + 180p) so the SFU picks the right quality for each receiver based on their bandwidth.
MCU (Multipoint Control Unit) — the server decodes all streams, composites them into one combined stream, and sends that to each peer. Each peer only downloads one stream, but the server does heavy CPU work. Rare in modern systems because SFUs scale better.
For production: use an SFU. It’s the right balance of simplicity, scalability, and quality. MediaSoup, Pion (Go), LiveKit, and Janus are popular open-source options.
Data Channels — The Hidden Gem
Data channels are the most underappreciated feature of WebRTC. They let you send arbitrary data — text, binary, files, game state — directly between peers using the same P2P connection as media.
const dataChannel = peerConnection.createDataChannel("game", {
  ordered: false,      // don't wait for order — fastest
  maxRetransmits: 0    // unreliable — drop lost packets
});

dataChannel.onopen = () => {
  dataChannel.send(JSON.stringify({ x: 100, y: 200 }));
};
You can configure each channel independently — reliable ordered delivery for chat messages, unreliable unordered for game state updates. Multiple channels on the same connection with different settings.
Compared to WebSockets, data channels offer lower latency (no server hop), no server bandwidth cost, and built-in encryption. The tradeoff is the complex setup (you still need signaling) and NAT traversal overhead. For real-time multiplayer games, collaborative editors, or any scenario where sub-50ms latency matters — data channels are hard to beat.
Common Pitfalls
A few things that trip people up:
- No TURN server — “P2P works on my local network” doesn’t mean it works across the internet. Always deploy TURN
- Ignoring ICE failures — monitor
iceConnectionState. When it goes tofailed, show the user a meaningful error, don’t just silently break - Not handling renegotiation — adding/removing tracks, switching cameras, or starting screen share requires SDP renegotiation. Handle the
negotiationneededevent - Forgetting about permissions —
getUserMedia()shows a browser permission prompt. Users can deny it. Handle that gracefully - Assuming low bandwidth — WebRTC adapts to available bandwidth automatically, but your UI should show quality indicators so users understand why video quality dropped
- Using Mesh for group calls — it doesn’t scale. Use an SFU if you have more than 3 participants
Summary
WebRTC enables real-time P2P communication in browsers — audio, video, and arbitrary data. The signaling server handles the initial handshake, then gets out of the way. NAT traversal (STUN for discovery, TURN for relay, ICE for orchestration) is the hardest part and determines whether a direct connection is possible. The protocol stack (SRTP + DTLS + SCTP over UDP) handles encryption, media delivery, and data channels. For group calls, use an SFU.
The most important practical lessons: always deploy TURN servers, use an SFU for group calls, and don’t sleep on data channels — they’re incredibly powerful for any real-time P2P data transfer.
More detailed notes with all deep dives (SDP format, codec comparisons, simulcast/SVC, platform support, debugging tools, real-world architecture examples), and interview questions:
https://github.com/sadensmol/learning_system-design/blob/main/webrtc-guide.md
Thanks for reading! More system design topics coming in the next parts of the series.
PS: have you built anything with WebRTC? Video calls, data channels, something creative? I’d love to hear what worked and what was painful!